使用Automator添加右键菜单

最近在开发支付宝小程序,写每个页面都要创建四个文件,建的不厌其烦,少一个都不行!看小程序Ide也是仿vsCode的,写一个插件来干这事吧!去找了半天,发现此Ide还不支持插件。
退而求其次,添加一个右键自定义菜单吧。因为使用的MacOS,使用到了Automator。

使用Automator添加右键菜单栏自动生成小程序需要的四个文件

自动生成文件脚本

现在用nodeJS做什么开发都很方便,就使用了它来写脚本。

1
2
3
4
5
6
7
8
9
10
11
12
13
14
15
16
17
18
19
20
#!/usr/bin/env /Users/shenyu.wang/.nvm/versions/node/v11.13.0/bin/node

const { existsSync, writeFileSync, lstatSync } = require('fs');
const { resolve } = require('path');
const curPath = process.argv[2];// process.cwd();

if (curPath && lstatSync(curPath).isDirectory()) {
const commonName = 'index';
const suffixs = ['acss', 'axml', 'js', 'json'];
suffixs.forEach(suffix => {
const path = resolve(curPath, `${commonName}.${suffix}`);
const content = suffix === 'json' ? JSON.stringify({ "defaultTitle": "" }, null, 2) : '';
if (existsSync(path)) {
console.log(path, 'exist');
} else {
console.log(path, 'not exist');
writeFileSync(path, content);
}
});
}

把脚本添加到Automator里

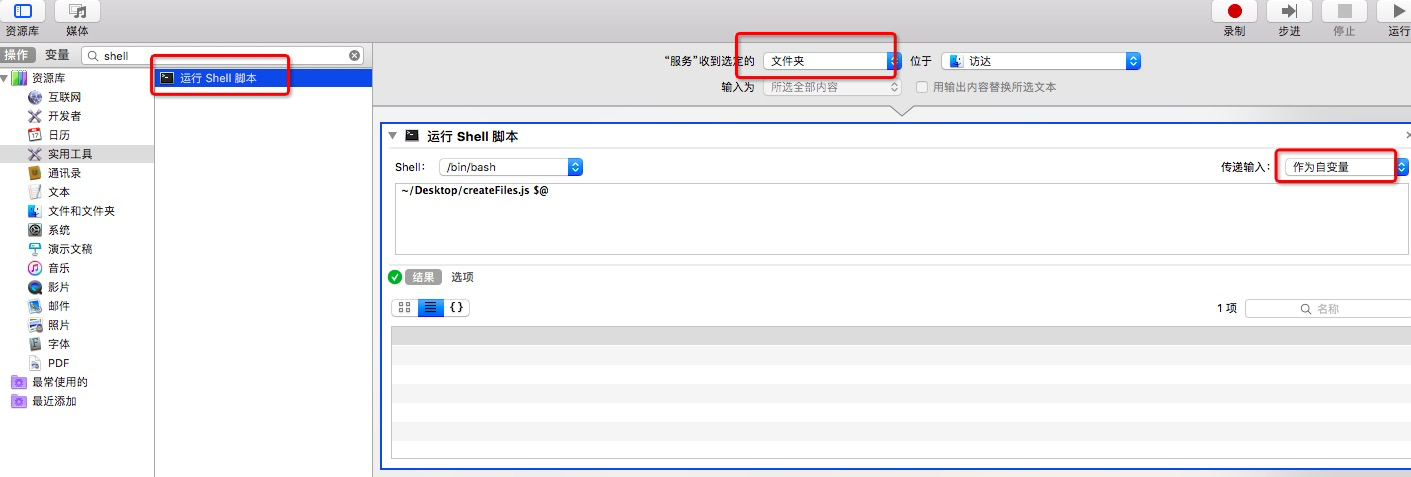
  • 进入Automator里,选择实用工具-运行Shell脚本-选择“服务”收到选定的文件夹
  • 选择/bin/bash,传递输入选择作为自变量。输入脚本内容~/Desktop/createFiles.js $@。这样,在运行的时候,会传入当前目录路径。
  • 可以去右键菜单运行了。感觉还是比较麻烦,要到Finder里去右键~~
  • shell中的特殊变量:$@表示所有入参,$1表示第一个入参,以此类推。
  • 参考链接:mac-context-menubash/node编写简单脚本文件

遇到的问题

  • bash脚本不认识js语法,不认识node关键字
    • 先直接在文件开头加了#!/usr/bin/env node,又提示env:node: No such file or directory,天呐,居然找不到node吗,一定是哪里没有设置。
    • 查了macOS的bash的不同,说是可以用软链接把node链接到node source上。太麻烦了,最后直接把which node获得的node目录,加在最后了。
    • 加了#!/usr/bin/env后,其实文件名是什么不重要了,比如可以写成*.txt。
  • 第一次运行,提示没有权限
    • chmod +x *.js

后续

过了几天,开发过程中发现小程序内置的组件,好多不能调整样式。官方文档中只有一句a-*开头的类是组件内置类,不建议使用。因为对支付宝小程序Ide有一定的了解了,知道了它是用electron开发的,在Ide预览的时候,是有各种组件的。所以准备去解压Ide文件看看有没有组件库的包。

1
2
cd /Applications/小程序开发者工具.app/Contents
open ./

发现有个Resources文件夹是用来存放代码的,直接拷贝出来。随笔点了点看了看目录结果,我们找的代码都在app目录里。进去发现,很多文件都使用asar工具打包了,所以第一步先把它们都解压出来。

解压asar

1
2
3
4
5
6
7
8
9
10
11
12
13
14
15
16
17
18
19
const asar = require('asar'); // 记得安装
const { readdirSync, statSync } = require('fs');
const { join } = require('path');
const curDirName = __dirname;
const files = readdirSync(curDirName);
const recurrenceFiles = async (files, curDirName) => {
for (const file of files) {
const fullPath = join(curDirName, file);
const fileStats = statSync(fullPath);
if (fileStats.isDirectory()) {
recurrenceFiles(readdirSync(fullPath), fullPath);
}
if (/\.asar$/.test(fullPath)) {
console.log(fullPath);
await asar.extractAll(fullPath, `${fullPath.slice(0, fullPath.length - 5)}_/`);
}
}
}
recurrenceFiles(files, curDirName);

搜索a-*

解压出来后,都是我们熟悉的包了。直接用vsCode搜索全局(node_modules也不放过),很轻松的就找到了内置组件包af-appx-ide-min.css。 这里贴一个路径
/Users/shenyu.wang/Desktop/Resources/app/vol_module_/node_modules/@alipay/tiny-base/src/appx/1.14.2/af-appx.ide.min.css

1
2
3
4
5
6
7
8
9
10
11
12
13
14
15
.a-swiper-indicator {
position: absolute;
bottom: 0px;
height: 14px;
width: 100%;
text-align: center;
-webkit-box-pack: center;
-webkit-justify-content: center;
justify-content: center;
display: -webkit-box;
display: -webkit-flex;
display: flex;
-webkit-transform: translate3d(0, 0, 0);
transform: translate3d(0, 0, 0);
}

这里面可以玩的东西有很多,比如随处可见的React语法、支付宝H5 bridge和小程序Api之间的关系等等,可以捣鼓捣鼓。

回到开头

突然想到,electron还是等于开源了呀。下大功夫分析一下代码,我们是可以直接在Ide的代码里实现上面的功能的。等有时间再玩玩吧~